Wednesday, 18 December 2013

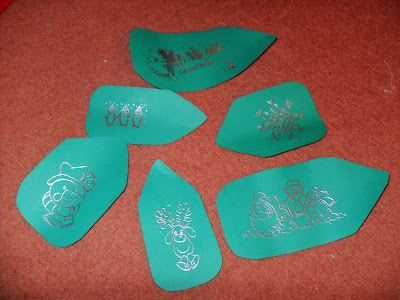
Christmas labels

 It's almost Christmas! I am childishly excited about Christmas this year (although to be honest, I am every year!). I have bought (and worn) my Christmas jumper and almost finished all of my Christmas shopping, so it's time to do some wrapping. Nothing more guaranteed to get me in the Christmas mood! And a little personal touch makes your presents extra special.


This is a really simple way to make some home made labels to decorate your presents. All you need is some rubber stamps, ink pad, embossing powder, heat source and some paper - all available in Hobbycraft.


First, I cut some label shapes from some festive green paper.


Choose your stamp and press it onto the ink pad, making sure ink is covering all of the stamp so you get the full picture.

Press the stamp onto your cut out label and then quickly cover in the powder before the ink can dry. Make sure all of the ink is covered and then gently tap off the excess powder.


 Heat from underneath with the heat source (do it from underneath otherwise all of the powder blows off!) and watch the powder melt before your eyes!


Et voilà! A personal label to stick on your beautifully wrapped present to give to that someone special.
Wednesday, 4 December 2013

Innocent Smoothies' Big Knit


Came across this little cutie in my local Boots! 


Innocent smoothies have joined forces with Age UK to raise money to help older people keep this warm this winter by encourage knitters to knit a little hat for an innocent smoothie bottle - what a great excuse to get the knitting needles out! And with 25p from each bottle going to Age UK it makes you feel better about spending so much on an innocent smoothie!


Tuesday, 19 November 2013

Decorated plant holder


This cute painted watering can was an impulse buy on a recent press trip to the south of France (perk of working for a magazine about France!). I saw it in an artisan shop in one of the places we stayed and thought it would look great with a plant in it. As it was nearly my mum's birthday I got it as a present for her and she decided to put a small Aloe Vera inside.


Handpainted by a French woman this can is unique and beautiful.

Here are some snaps from my trip to make you all jealous...

An olive stall in Les Halles market in Narbonne


The beautiful Roman town of Narbonne


View from my hotel room across the vineyards 


The stunning medieval cité of Carcassonne


Sunday, 3 November 2013

Chocolate Smarties Cake


  This is the result of a spot of Sunday baking! I am a member of the Cheltenham branch of the Clandestine Cake Club, a group that meets once a month or so in a different location each time. Everyone has to bring a cake along a theme, and this month's theme was 'colours of the rainbow' - I think I fulfilled the brief!


 It is a basic chocolate cake (a Mary Berry recipe, can't fail!) covered in chocolate buttercream icing and decorated with smarties. It took nine packets to get enough of all the different colours, turns out orange and brown are the most common colours and green is the least!

Wednesday, 30 October 2013

Holiday buys from Dubrovnik

Dubrovnik's old town - you might know it better as King's Landing in Game of Thrones!

I recently returned from a great week's holiday in Dubrovnik, Croatia. As you can see it's a beautiful town and there is plenty to do, I would definitely recommend it as a holiday destination! Always on the look out for some crafty buys I spent some kuna in the local markets, here are my Croatian purchases.


This canvas picture is of Dubrovnik's old town at sunset, bought from a street seller for about £20. I took lots of photos of the sunset (we had a prefect view from our apartment) so I am planning to paint one myself - watch this space.


I bought this necklace from a small shop in one of the narrow streets for about £10. I love the colour and have a bracelet and earrings already in the same stone so I can mix and match.

Here are some more holiday snaps to make you jealous! I wish I could go back...

The view of the old town from our apartment


The port on a sunny day


The sun setting over Dubrovnik's old town


Me attempting to climb some of the many steps on the island of Lopud

Sunday, 6 October 2013

Customised maxi skirt


I am off on hols soon to sunny (hopefully) Dubrovnik in Croatia and in preparation I decided to give my maxi skirt a bit of a facelift. I enjoy customising my clothes, especially high street garments, so I have an individual piece that no one else will be wearing! The idea for this customisation came from skirts I've seen in the shops, but rather than buy a new one I decided to alter a maxi skirt I've already got - waste not, want not!


First I lay the skirt flat and marked out the curve I wanted. It took a few attempts to get a symmetrical shape that fell nicely when the skirt was on! I measured and marked the curve with tailor's chalk (remember to leave a hem) and then cut away the excess fabric.
 Turn the hem under and pin. Be careful to check the skirt still hangs nicely as the pleats at the waistband mean the fabric isn't straight.
 I decided to carry the curve on around the side seams because the skirt looked a bit strange if I didn't! Again, be careful to make the curve symmetrical.
 I then simply sewed the hem using a machine running stitch. The skirt originally had a double stitched hem so I decided to do the same. Finally, rub off the chalk and press the skirt.

Et voilà, an individual curved maxi skirt (modelled beautifully by moi!) that I can wear on holiday safe in the knowledge that no one else will have the same one!

Wednesday, 11 September 2013

Gromit hunt!

Bristol (and the surrounding area) has been home to 80 Gromits for the past few months, decorated in a variety of ways. Seeing as I live nearby and I haven't actually seen any of them yet I decided to go on a Gromit hunt before they disappeared, and managed to find 25! 

These are some of my favourites...

 Where's Wallace??

 Doodles!

 The King

 Gromit-o-matic (love the names for the different parts of his body!)

Gromit Lightyear

Wednesday, 28 August 2013

Make up brushes travel roll


Between visiting friends/boyfriend and trips across the Channel on press trips (one of the perks of working on a magazine about France!) it seems like I'm permanently packing a weekend bag for nights away from home. You'd think by now I'd be an expert at packing light but I always seem to be cramming things into my bag so I am a big fan of anything that makes travelling easier and this roll is an ideal way to carry all my make up brushes.

The idea for making this came from the blog Trends With Benefits which I discovered recently and is fill of great ideas and inspiration.


First you need to decide how many brushes and what size you need to fit in (as you can see I have a lot!) and measure the fabric accordingly to be large enough to fit in all of your brushes.


You need two pieces of fabric for the inside and outside of the roll, a contrasting fabric to form the pockets for the brushes and a piece of felt to sandwich between the two main pieces to stiffen the roll and ribbon to tie the roll.


I pinned the outside piece of fabric onto the felt and sewed along the edge to attach them together.

Then I folded the contrasting fabric in half (right sides together), sewed along the long edge and turned the right way round. Position on the inside piece of fabric and pin along three edges. 


Next you need to mark out the slots for the different brushes. I did this by placing each brush between the main fabric and the contrasting fabric and pinning enough space for each brush - the pins may need some tweaking to fit all the brushes in. Then sew neatly along the pin lines to create the brush slots.


Work out where the ribbon is going to attach and pin both ends onto the wrong side of the outside/felt fabric. Place the inside and outside fabrics together (right sides together) with the ribbon sandwiched in between. Then sew along three edges and along part of the final edge leaving enough space to turn the roll the right way round. Sew the gap up using an invisible stitch.


Et voilà a travel roll to keep all your make up brushes neat when you're on your travels! 


Saturday, 10 August 2013

Rejuvenated Ottoman


The inspiration for the rejuvenation of this ottoman came from the TV programme 'Kirstie's Vintage Home' which I absolutely loved! It gave me heaps of ideas to give old furniture a new lease of life and I've slowly been putting them into practice around my family home.


This was how the ottoman looked before I got my hands on it. Pretty bland and uninspiring!


The first step was to paint the ottoman inside and out. It is going into my parent's bedroom which is pale blue and red so I used this as my colour scheme. I used the same paint that was used to paint their walls so just ordinary emulsion paint. It needed 2 coats of paint to cover the wood completely but if you wanted to keep the wood effect you could use a watered down paint as a wash and the wood grain should still show through.


Once the paint had thoroughly dried I covered the top of the lid with wadding, bought quite cheaply from Hobbycraft. I trimmed the edges so the wadding fitted and stuck it down with double-sided tape.


Next step was to cover the lid with fabric. I chose this gorgeous patterned fabric - in red to match the colour scheme. First I unscrewed the hinges so the lid was separated from the box. Place the fabric with the pattern straight and centred and then flip the lid over. 

Now fold over the edges of the fabric to create a hem to hide the raw edges. This stage is a lot easier with two people so one can hold the fabric taut while the other hammers the tacks in. You can either use a staple gun or hammer tacks in to secure the fabric.

Secure the fabric in the centre of each edge to keep it in place and then work your way around the lid hammering in as many tacks as needed. I folded the corners like you would when wrapping a present, you may need to trim some of the fabric otherwise it will be too bulky.


Et voilà a super stylish ottoman to provide storage and look fantastic! I'm quite jealous this is going in my parent's room, I might have to find one for me!