Saturday 7 February 2015

DIY laundry bag


No one wants their dirty laundry hanging around so I decided to make this simple but pretty laundry bag to keep it all tidy and to brighten up my room.


You will need:
Fabric - cotton, about 1.5-2m
Thread in a matching colour
Cord to make the drawstring
Scissors
Pins
Tape measure


Fold the fabric in half (right sides together) and cut to the desired size for your laundry bag, remembering to leave a 1.5cm seam allowance along the 2 long sides and a 5cm seam allowance along the top to form the drawstring.

Lay the folded fabric flat and pin along the 2 long sides. Sew along the 2 sides, 1.5cm from the edge in your matching thread, stopping 5cm from the top on one of the sides to allow you to thread your cord through.

Cut a slit at the bottom of the sides to the stitching and press the seams open.


Fold over the top seam, first by 1cm and then by 4cm so the raw edges are hidden. Make sure the side seams are flat before you pin (see below).

Sew along the top as close to the fold as you can and as neatly as possible as you will see this stitching on the outside of the bag.


When you get to the side seam you left a gap on make sure to fold over the sides and match it to the side seam to hide all raw edges.


Attach a safety pin to the end of your cord to allow you to easily thread it through the top of the bag.

Push the safety pin through the gap you left and thread it around the entire top of the bag, pulling it out of the other side.

Knot the ends of the cord together to stop it going back through the seam.


To create the sign on the front of the bag decide what size you want it to be and cut a piece of white fabric to size, remembering to leave a 1.5cm seam allowance on each side.


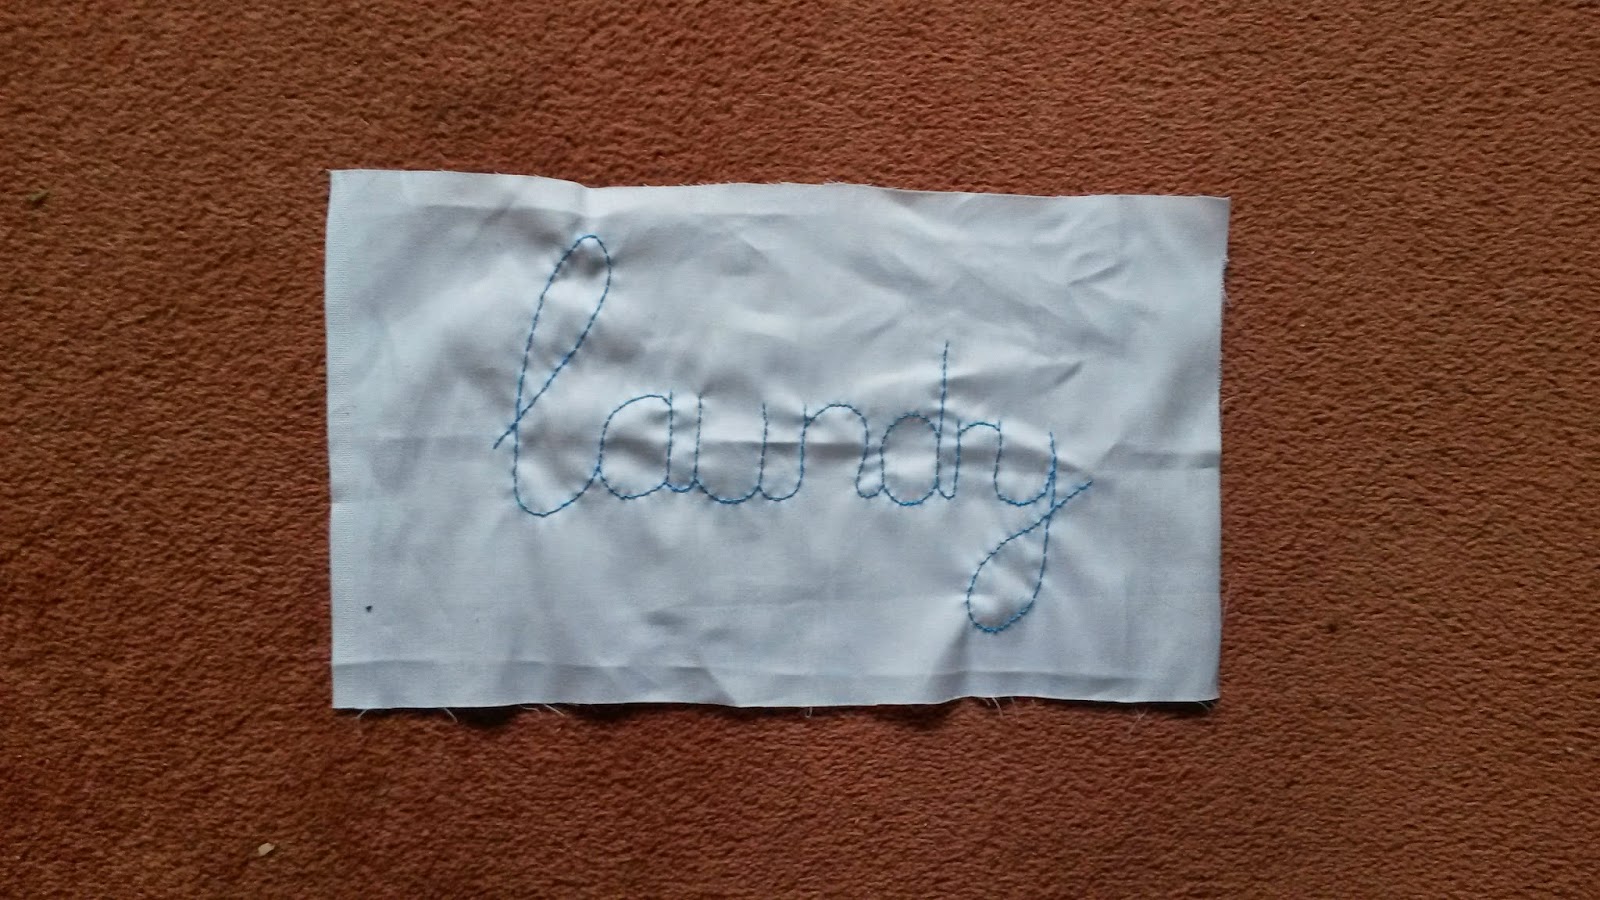
Write 'laundry' on the fabric in pencil or chalk and sew along the letters with several strands of embroidery thread in the colour of your choice. I decided on blue to match the bag fabric.


Press the fabric to remove the creases then measure the 1.5cm seam allowance. Fold over and press the edges to get a clean edge.

Trim the corners into a triangle so they don't show on the front.


Pin the sign onto the front of the bag making sure it is centred and straight and then sew along the edges. I chose a white thread but you could match it to the writing.

Top stitch neatly, close to the edge, making sure not to sew the front and back of the bag together.


Et voilà! A simple-to-make laundry bag that looks great in the corner of your room and keeps your dirty washing neat and hidden.

Sunday 21 September 2014

The Handmade Fair

Crafters arriving at Hampton Court Palace for the Handmade Fair
As you may have noticed I haven't written a post recently. This is mainly because of time constraints – I just simply haven't had time to make anything crafty recently, let alone blog about it. However, a trip to the Handmade Fair yesterday has reignited my love of craft and I have come away with loads of ideas for things to make! Plus I am moving house in a month and I am determined that this time I am going to fill it with home-made delights!

For any of you not lucky enough to get to the Handmade Fair this weekend, don't worry I took lots of pictures for you to browse! Basically it was a giant craft fair in the grounds of Hampton Court Palace in London, organised by Kirstie Allsopp (love her!) and Mollie Makes (great magazine!). There were workshops to get involved in and lots of stalls selling handmade goodies, and all the fabric/ribbon/patterns/paint... any crafter could need.
It's Kirstie Allsopp!

I went with my mum who is also a keen crafter (in fact, it was her who taught me to sew) and the journey involved catching a train at 7am on a Saturday – committed or what?! We arrived just in time for our first event of the day which was a 'Mollie Makes Mash up' introduced by the one and only Kirstie Allsop (so exciting!).

"What is a Mollie Makes Mash up?" I hear you ask. Well, it was a head-to-head between Lisa Comfort (owner of the Sew Over It cafe in London) and knitter Benjamin Wilson. They were each given a plain white t-shirt and asked to transform it into something amazing. Lisa chopped it up, added a waistband and a skirt and turned it into a super-cute dress. Benjamin dyed it and slashed some holes to turn it into a purple tie-died grunge top. Lisa won the head-to-head.

Benjamin vs Lisa on the stage
Next we had a bit of a wander around the stalls (I was very restrained even though I could probably have bought something at every stall!). Some of the things that really caught my eye were a roller to paint a pattern onto plain fabric or furniture from The Painted House (genius!), patterns for Lisa Comfort's cute dresses and metres of fabric and ribbons.

Just a few of the craft stalls 
Lisa Comfort's Sew Over It stand


Our workshop was for Annie Sloan Chalk Paint, led by the woman herself. We got to paint and wax a candlestick before rubbing down some of the edges to reveal the colour underneath. Unfortunately my candlestick was orange underneath and dark blue on top – not my favourite combination. But it was really interesting to hear the different ways you could use the paint and it has given me lots of ideas. The independent shops that stock Annie Sloan Chalk Paint run workshops on using the paint and luckily there is one quite near home so I think I will be signing up for one of those!

My attempt at chalk painting!
Annie Sloan talking about her chalk paint


Our other workshop was in gift wrapping which sounded really interesting but sadly it was only 30 minutes and there wasn't much time to learn much except how to tie a bow. So the recipients of Christmas presents from me this year can look forward to lots of bows and ribbon on their presents!


Talking to some other visitors on the train back it sounded like we missed a few of the free workshops which all sounded really good but all in all it was a fun day and I now feel fully inspired to get my sewing machine and paintbrush back out. So watch this space!


Tilly and the Buttons (Sewing Bee contestant last year) giving a sewing masterclass


Wednesday 30 July 2014

Papier-Maché Magazine Holder

Working in magazine publishing means I have a lot of magazines hanging around! A mixture of the magazine I work on and other women's, lifestyle and craft mags (all in the name of research obviously!). So I decided I needed some way of storing them rather than putting them in a pile on my floor and bought a magazine holder. It was a plain wooden holder which definitely needed some jazzing up, but rather than painting it I decided to do some papier-maché - something I haven't done since I was a child!


The inspiration for this came from a visit to William Wordsworth's house in the Lake District last summer (strange place to find inspiration, I know!). His wife had covered the walls with newspaper, presumably to keep it warm or cover up the bare walls, and my Dad and I spent ages reading the old newspapers from hundreds of years ago. Although my newspaper-covered magazine holder probably won't be visited by tourists in future centuries it will be pretty cool to look at it in a few months or years time and read about the events going on in the world!

Papier-maché is really simple and all you need is some newspaper and PVA glue and it is pretty much just a case of applying a layer of PVA glue to the magazine holder, layering the newspaper on top and covering it with another layer of PVA glue to keep it in place and give it a nice shine. Although you can have some fun being artistic and arranging the ripped up newspaper artfully.


The only thing to be careful of is waiting for one side to dry before beginning on the other or you will end up with wet glue on all sides and no way of standing it up to dry without getting glue everywhere! I did one big side, front, back and bottom and left it to dry overnight and then did the other side and the inside.


Et voilà a really simple way of personalising an object. When my magazine collection has outgrown this holder I am planning to cover my next one in a pretty wallpaper.

Sunday 20 April 2014

Make your own cushion cover


My mum decided the living room needed a bit of a refresh so I offered to make some new cushion covers. This is a great way to quickly brighten up a room with minimal expense.


You will need:
Cushion
Fabric
Newspaper templates
Matching thread
Scissors
Pins
Button
Cord to make the button loop


First, I measured the cushions and worked out what size the covers needed to be, taking into account a 1.5cm seam allowance on the edges plus a 3cm seam allowance for the top edges of the front flaps.

Then I drew out a template on newspaper. I decided to make them with a flap on the front fastened with a button rather than a traditional side zip so I needed a back piece and 2 front pieces.

Then I lay and pinned the patterns out on the fabric putting them in the order: long front piece, back piece, short front piece to make sure the stripes matched.

Cut out the pattern pieces.


Fold over the top edges of the two front flaps, pin and neatly sew in a matching thread.


Lay the shorter front flap onto the back piece (right sides together) and pin along 3 sides. Try to match up the stripes as you pin.

Sew along the 3 sides 1.5cm from the edge.


Lay the longer piece on the back piece (right sides together) and pin along 3 sides.

Sew along the 3 sides, 1.5cm from the edge.


Cut off the corners and turn the cushion cover the right way round, pushing out the corners.

Press flat.

To make the button loop first work out the middle of the top flap and mark with a pin.

Work out the length of your loop and cut the cord to size, make sure to wrap sellotape around the ends to stop it unravelling.

Make the loop and sew onto the middle of the top flap on the underside.


Work out where the button should go using the loop (you will need the cushion in the cover at this point).

Sew the button onto the bottom flap.


Et voilà! A striking cushion cover to brighten up our living room. Simply repeat the process for as many cushions as you have.

Tuesday 4 February 2014

Photo bunting


Photos are a great way to brighten up the walls but there are only so many frames you can put up and blutack can ruin the walls (as my mum keeps telling me!) so I decided to find a different way to display my photographic memories. 


I got a length of jewellery wire, put two picture hooks into the wall and wrapped the jewellery wire around each hook, stretching it like a washing line between the two.


I painted these plain wooden pegs (bought from Hobbycraft for a couple of pounds) several different colours to brighten them up.


Then I chose the photos/postcards/cards I wanted to display and spent ages arranging them on the line, attaching them with the pegs. This is a picture from my Gradball two years ago.

I had so many pictures that I decide to put up another line to show them all off!

Et voilà, a simple but unusual way to decorate your walls with some of your favourite memories.


Wednesday 18 December 2013

Christmas labels

 It's almost Christmas! I am childishly excited about Christmas this year (although to be honest, I am every year!). I have bought (and worn) my Christmas jumper and almost finished all of my Christmas shopping, so it's time to do some wrapping. Nothing more guaranteed to get me in the Christmas mood! And a little personal touch makes your presents extra special.


This is a really simple way to make some home made labels to decorate your presents. All you need is some rubber stamps, ink pad, embossing powder, heat source and some paper - all available in Hobbycraft.


First, I cut some label shapes from some festive green paper.


Choose your stamp and press it onto the ink pad, making sure ink is covering all of the stamp so you get the full picture.

Press the stamp onto your cut out label and then quickly cover in the powder before the ink can dry. Make sure all of the ink is covered and then gently tap off the excess powder.


 Heat from underneath with the heat source (do it from underneath otherwise all of the powder blows off!) and watch the powder melt before your eyes!


Et voilà! A personal label to stick on your beautifully wrapped present to give to that someone special.

Wednesday 4 December 2013

Innocent Smoothies' Big Knit


Came across this little cutie in my local Boots! 


Innocent smoothies have joined forces with Age UK to raise money to help older people keep this warm this winter by encourage knitters to knit a little hat for an innocent smoothie bottle - what a great excuse to get the knitting needles out! And with 25p from each bottle going to Age UK it makes you feel better about spending so much on an innocent smoothie!